Welcome to another feature exploration of the Communication Center. This segment dives into the integration capability with Google My Business Chat.
Importance of Google My Business
As emphasized in our initial video, Google My Business (also known as Google business profile) stands as a paramount tool for lead collection. When potential clients search for businesses by type or location, Google My Business listings are typically what they first encounter. In the subsequent section, we’ll delve into how reviews can significantly bolster your ranking on Google My Business. It’s worth noting that some services exclusively offer Google My Business optimization at costs exceeding our entire service package, underscoring its significance.
Google My Business Chat Feature
There exists a lesser-known feature in Google My Business – the Chat option. While users might often overlook this feature, it’s a powerful tool to directly communicate with potential clients. Where most business owners falter is by not responding promptly, often due to notifications going to their Google Map business app. With our universal inbox and consolidated messaging feature, these chat notifications are directly funneled to your primary inbox.
Setting It Up:
Launchpad Integration:
Navigate to the launchpad and select ‘Google My Business’.
Connect your account. (For this demonstration, we used a fictional business without a Google Map business listing. However, in a real-world scenario, select your associated Google account.)
Integrations in Settings:
Go to ‘Settings’ and find ‘Integrations’.
Though our demo lacks this due to its fictional nature, you’ll notice the Google My Business option.
Directly from here, enable the Google My Business chat, bypassing the need to go to Google My Business.
Client-Side View:
Post integration, clients searching for your business will observe a chat button on their end.
They have the options to call or chat, and with the integration, you can respond promptly.
Benefits
By leveraging this feature, you’re extending more communication avenues to your clients without complicating the communication process on your end. The beauty lies in its simplicity: irrespective of the platform they use to reach out, their message lands in your consolidated inbox.
Conclusion
While Google My Business Chat might be underutilized, for those who harness it, it represents another channel to drive business. As a small enterprise, amassing leads is crucial, and this integration ensures you never miss an opportunity.
For further queries or assistance, reach out to our support team at EZtransition.
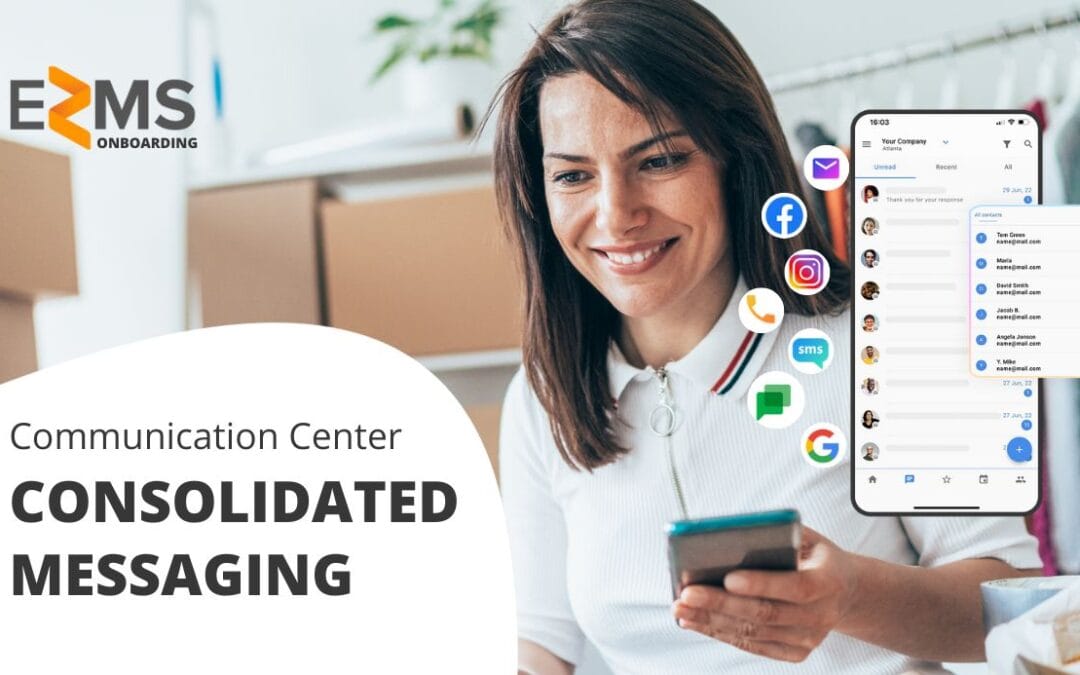
As communication channels diversify, small businesses often find themselves juggling multiple tools, risking missed messages and potential leads. The solution? A single platform to consolidate all messaging. This guide introduces you to the Consolidated Messaging feature and its benefits.
1. Why Consolidated Messaging?
Problem:
Multiple communication tools can lead to missed interactions. For instance, you might miss a Facebook message until a week later.
Juggling different platforms can be inefficient and can lead to a lack of coherence in responses.
Solution:
The Consolidated Messaging feature centralizes all your communications.
Everything from text messages, emails, to social media messages, are accessible in one unified inbox.
2. Using the Conversation Inbox
Navigation: The main hub for all your messages is the “Conversations” section.
Message Management:
Messages are categorized as “unread” or “recent.”
For efficient management, ensure the “unread” section is regularly cleared to achieve an “inbox zero” status.
3. Integrated Communication Channels
Current integrations include:
Text
Email
Phone
Google My Business
Facebook
Instagram
Reviews (including Google reviews)
Future integrations:
Plans are in motion to integrate additional platforms like WhatsApp.
4. Benefits of Consolidated Messaging
Unified Communications: No more switching between apps or platforms.
Customer-Centric: Respond to customers on the platform they reached out on, offering them a seamless experience.
Flexibility: Access your consolidated messages via your browser or your phone, ensuring you’re always connected.
5. Upgraded Features
For businesses seeking more functionality:
Upgrading to higher tiers like the “Marketing Center” or “Sales Center” unlocks automation features.
Automations can tag users, send automated responses, offer free gifts, and more based on incoming messages.
Conclusion and Support
Consolidated Messaging not only simplifies communications but also ensures that you’re always connected to your customers, regardless of the platform they choose. For any queries or support needs, please reach out to our dedicated team at [email protected].
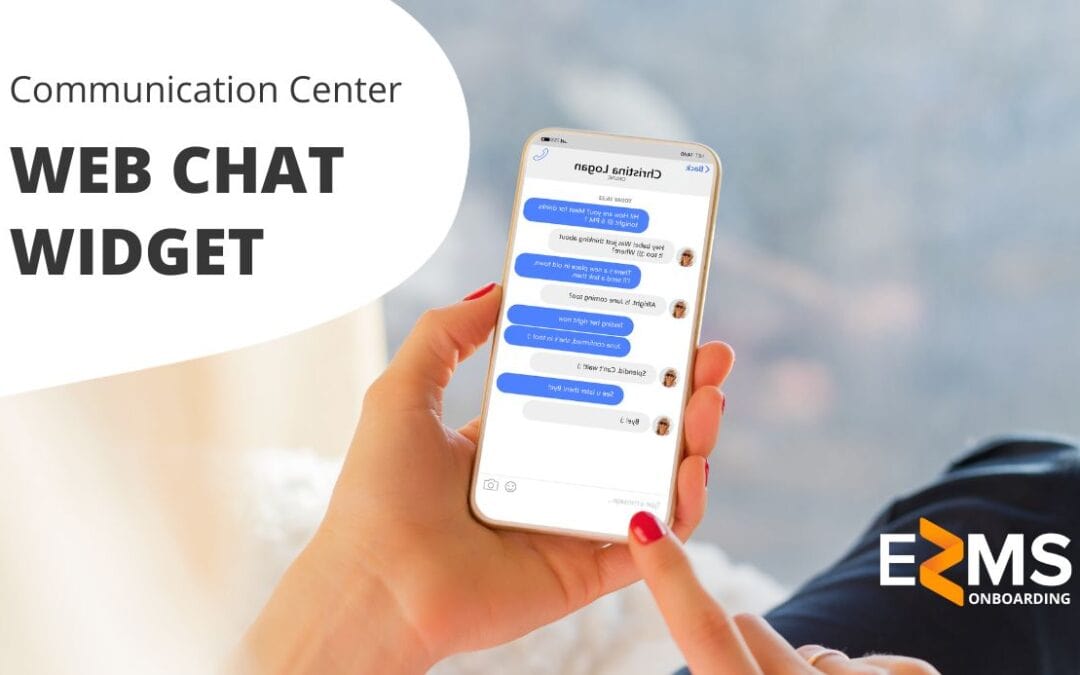
In today’s digital landscape, businesses need efficient tools to interact seamlessly with their customers. The web chat widget is a ubiquitous feature seen on many websites. However, there’s a significant limitation in most conventional widgets: customers must remain on the website for real-time communication. As small business owners juggle multiple responsibilities, real-time response becomes challenging. Our solution offers a unique approach to this problem.
1. The Unique Web Chat Widget Approach
Traditional Limitations:
The conventional widgets require both parties to be present in real time.
Small business owners often find it difficult to respond immediately.
Our Widget’s Advantage:
Our widget does more than just look like a chat. When users input their details, the information is collected rather than initiating a live chat.
It captures the user’s name, phone number, email, and message.
Instead of relying on real-time website chat, users receive responses directly to their cell phones, promoting increased interaction.
2. Setting Up The Web Chat Widget
Step-by-Step Process:
Accessing the Launch Pad: Head to your settings and navigate to the launch pad. The widget settings are not located in the general settings but specifically on the launch pad.
Website Integration:
Click on the web chat widget option.
Input your website URL.
WordPress Users:
Our platform has a specific plugin for WordPress users. If your site runs on WordPress, you’ll be prompted to install the plugin.
Follow the on-screen instructions for a smooth installation.
Other CMS Users:
If you utilize another Content Management System (CMS) like Shopify or Squarespace, there are distinct pathways to integrate the widget. The system will provide the appropriate steps based on your CMS.
Customizing the Widget:
Once installed, you can choose the color, theme, and other visual aspects of the widget to align with your website’s aesthetics.
3. Communication Flow
When a user interacts with the widget, their details are captured.
You will receive the message in your conversations.
Respond to users directly at your convenience. Responses are relayed to the user’s cell phone, ensuring they don’t have to wait on the website.
Conclusion and Support
The Web Chat Widget to SMS offers a refreshing way to bridge the communication gap, ensuring you never miss a potential lead while also providing users with an efficient communication method. Its design keeps in mind the busy schedules of small business owners, ensuring no compromise on customer interactions.
Should you encounter any issues during the setup or have further queries, please reach out to our support team at [email protected]. Our dedicated team is always here to assist you in real time.
In the fast-paced world of business, missed calls can equate to missed opportunities. Recognizing the potential pitfalls of traditional communication methods, we’ve developed an advanced Missed Call Handling system. This feature-rich solution ensures you never skip a beat, maintaining continuity and professionalism in all interactions.
Core Features:
Centralized Call Management:
Funnel all your missed calls into a single, easily accessible system.
Assign unique numbers for different campaigns to streamline tracking and client interactions.
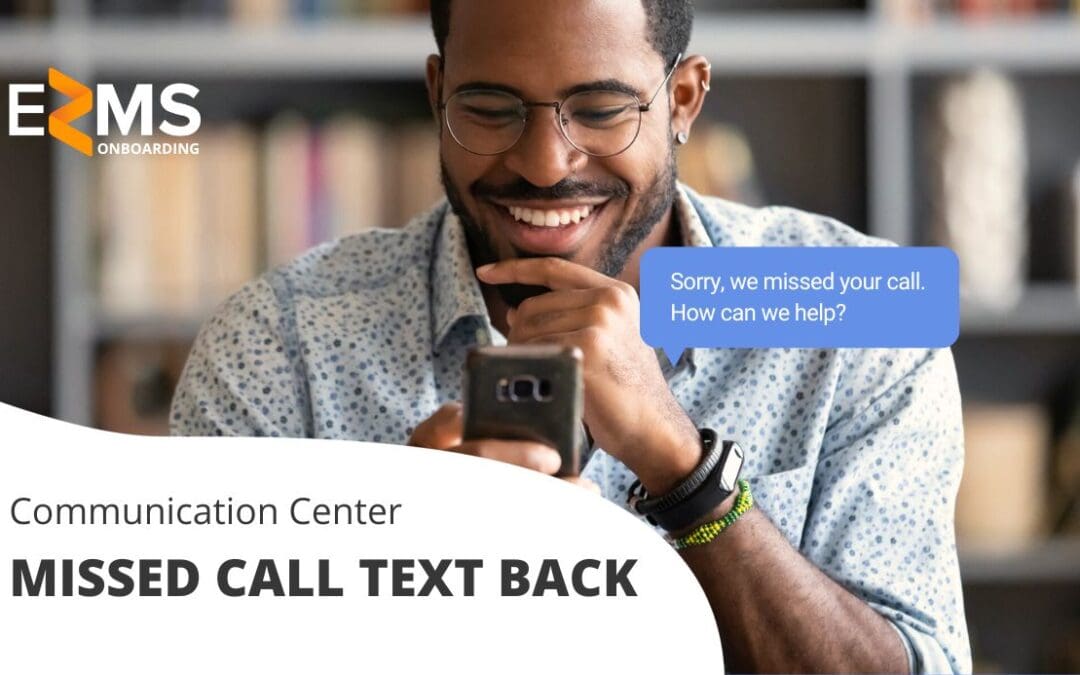
Instant Automated Text Responses:
For every unanswered call, our system sends an automatic text message to the caller.
Customizable messages allow you to maintain your brand’s voice and tailor your client’s experience.
Engaging Text Conversations:
Convert missed calls into engaging text conversations.
Whether you’re available immediately or later, the system ensures no lead goes unattended.
Integrated Call Recording:
Opt to record calls for training and quality assurance purposes. Always ensure you adhere to state regulations regarding call recording notifications.
Detailed Setup Guide:
System Configuration:
Begin by naming your number; for instance, if you’re using ‘phone.com’ as your service, label it accordingly.
Determine your caller ID preferences: either pass the dialed number as the ID or display the actual caller’s number.
Tailored Call Handling:
Define the timeout durations for incoming and outbound calls.
Choose if you’d like to enable the call connect feature, especially useful for systems that use prompts like “Press 1 for…”.
Business Profile Integration:
Input your primary business number into the profile. This won’t be the new number generated but rather your original business line.
Populate all relevant business details. This aids in crafting automated messages that resonate with your brand voice.
Customized Missed Call Text Back:
Turn on the missed call text back feature.
Create a compelling message that will prompt the caller to engage with you via text.
Benefits & Considerations:
Switching to our Missed Call Handling system not only modernizes your communication methods but also eliminates the redundancies of checking voicemails or relying on impersonal answering services. As businesses pivot to more immediate and accessible forms of communication, this tool can significantly elevate your customer interaction quality and responsiveness.
Always ensure that any feature, especially call recording, aligns with your local regulations and laws.
Conclusion:
Don’t let another opportunity slip through the cracks. Dive deep into this system, test its functionalities, and witness firsthand the transformation it can bring to your business communication. As we always say, it’s not just about the tool, but how you leverage it for maximum efficiency.
Stay connected, stay ahead. We’ll see you on the next update!
Hello and welcome to EZtransitions EZMS Training! If you’re new to EZMS or even if you’ve been around for a while, this guide is going to simplify things for you. Ready to dive in? Let’s go!
1. Accessing EZMS
Before anything else, you should have your login credentials ready. If you’re missing this vital piece of information, fret not! Reach out to your team member or contact us directly to set up an account.
Once logged in, head straight to your Launchpad.
2. Install the Mobile App: Lead Connector
This app is an absolute game-changer, streamlining all your lead connections. Whether you’re team Android or team iPhone, there’s a version for you. If you haven’t yet installed it, you’ll get an option to receive a link through a text message.
Features:
View and manage all your leads in one place.
Facilitate rapid communication through social media, texts, and emails.
Monitor your sales pipeline effortlessly.
3. Connect Your Platforms
Google My Business: By connecting this, only once per organization, you’re ensuring efficient communication with those who find you on Google. This nifty integration even lets you dispatch reviews!
Facebook: A great tool for businesses. Not only can you communicate directly with your audience, but also keep tabs on your Facebook ad campaigns.
Web Chat Widget: Perfect for gathering leads right from your website. It prompts users for their contact information and then allows continuous conversation through text.
Stripe: The modern solution to handling payments. From calendar bookings to landing page offers, all payments can be directly routed to Stripe.
Business Listings: Boost your online visibility. Connecting here helps with your SEO and makes your business more discoverable.
WordPress: Although optional, if you find your WordPress website lagging a bit, this connection can speed things up for you.
4. Add Team Members
If you’re ready to bring more members aboard EZMS, it’s a breeze. Simply click on the add button, input their work email, and voila! And if you ever need assistance, we’re just a call or message away.
Conclusion: Thanks for joining us in this brief introduction! There’s so much more that EZMS offers, and our upcoming videos will shed light on those functionalities. Until then, explore and enjoy the platform. Your journey to streamlined business management has officially begun! 🚀
Begin by specifying your event’s date and time. If the event doesn’t have a set starting and ending time, opt for the ‘All-day Event’ feature. In the advanced settings, options to conceal the event time or its conclusion time are available; these can be accessed by selecting ‘Hide Event Time’ or ‘Hide Event End Time’, respectively.
Event Repeating
For recurrent events, the MEC platform simplifies repetition with its ‘Event Repeating’ feature. To utilize, enable the ‘Event Repeating (Recurring events)’ option found in the respective tab. Here, various repetition preferences become available:
Repeat Options:
Daily: Set your event to recur daily.
Every Weekday: Event recurs solely on weekdays.
Every Weekend: Schedule weekend-only repetitions.
Specific Weekdays: Determine which weekdays the event recurs on.
One-day events: daily, weekly, weekends, monthly, or yearly.
2-7-day events: weekly, monthly, or yearly.
Up to 30-day events: monthly or yearly.
Extended events: annually.
For multiple occurrences on a single day: use custom day repetition.
Advanced Recurrence: Choose specific days, e.g., every second Monday or the last weekend of the month.
Setting Repeat Intervals
This determines the gap between repetitions. As an example, with a weekly repeat set and a ‘Repeat Interval’ of 2, events will happen bi-weekly.
End Repeat
Decide how repetitions end. Options include:
Never: Continuous repetition.
On: Set a specific end date.
After: Determine repetition count. E.g., selecting 10 will stop after 10 occurrences.
Additionally, opt for displaying only the upcoming event instance on archive pages and shortcodes.
Defining Location/Venue
Indicate the event venue. You can either pick from pre-existing venues or add a new one. To add, navigate to the ‘Location/Venue’ tab and select ‘Insert New Location’. Follow by inputting relevant location details.
Event Organizer Details
Assign an event organizer, either from previous entries or by adding a new one. To add, provide the organizer’s contact details, including name, phone, email, and website or URL link.